- Connect your Router
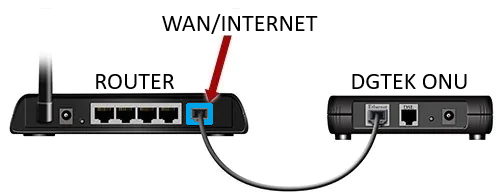
- For Pineapple Net FTTP Connections
- Connect one end of the Ethernet Cable to the WAN or Internet Port of your Wireless Router
- Connect the other end of the Ethernet Cable to the Ethernet Port of your DGtek ONU
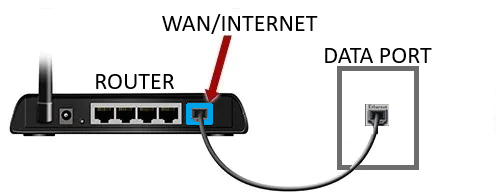
- For Pineapple Net FTTB Connections
- Connect one end of the Ethernet Cable to the WAN or Internet Port of your Wireless Router
- Connect the other end of the Ethernet Cable to the data port in your apartment
- The active data port will usually have a DGtek sticker on it to indicate the correct port
- The active data port will usually have a DGtek sticker on it to indicate the correct port
- For Pineapple Net FTTP Connections
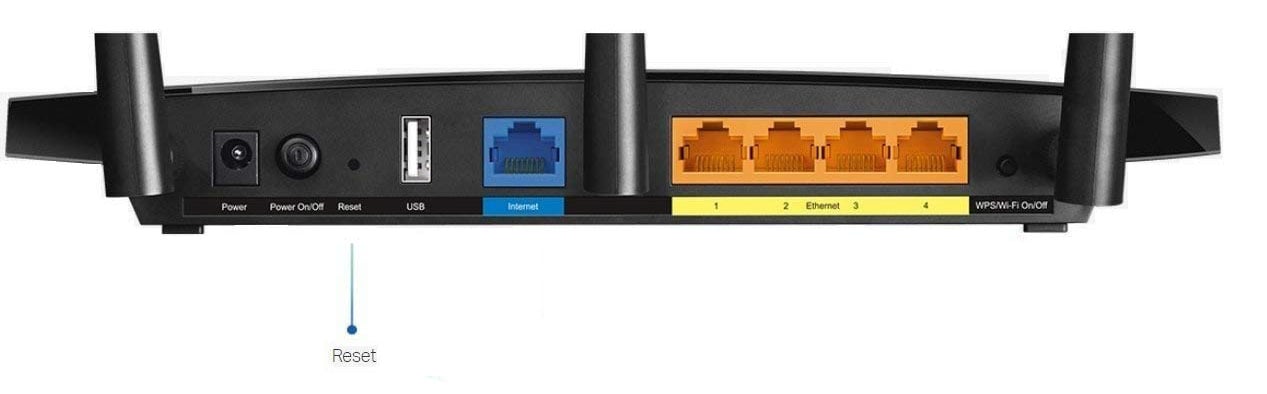
- Reset your Router
- Using a small object such as a paperclip or toothpick, press and hold the Reset button on the back of the router for at least 10 seconds, then release it.
- Using a small object such as a paperclip or toothpick, press and hold the Reset button on the back of the router for at least 10 seconds, then release it.
- Connect to the Wi-Fi Network
- On a laptop, desktop, mobile or tablet, please reconnect to the Wi-Fi network. The name of the Wi-Fi network is located on a sticker on the base or back of the router.
- Your Wi-Fi Networks will be labelled “SSID” and the default password should also be listed on the same sticker
- Your Wi-Fi Networks will be labelled “SSID” and the default password should also be listed on the same sticker
- On a laptop, desktop, mobile or tablet, please reconnect to the Wi-Fi network. The name of the Wi-Fi network is located on a sticker on the base or back of the router.
- Access Router management page
- Once you have connected to your Router's Wi-Fi, open a web browser and type the following into the address bar and press enter:
- 192.168.0.1
- or
- tplinkwifi.net
- 192.168.0.1
- You will be prompted to create an Administrator Password for your router - this will be used in the future to access the management page of your router

- Once you have connected to your Router's Wi-Fi, open a web browser and type the following into the address bar and press enter:
- Configure Time Zone
-
Select your time-zone form the dropdown, then click Next

-
- Configure your Connection
- In the Connection Type dropdown, select your Connection type
- If your connection type is PPPoE
- Select PPPoE from the list then click Next

- Enter your Pineapple Net Username and Password then click Next

- Go to Step 7
- Select PPPoE from the list then click Next
- If your connection type is DHCP or Dynamic IP
- Select Dynamic IP from the list, then click Next

- Select Do NOT Clone MAC Address then click Next

- Select Dynamic IP from the list, then click Next
- If your connection type is PPPoE
- In the Connection Type dropdown, select your Connection type
- Setup your Wi-Fi Network
- By default, Smart Connect is enabled - this feature lets your router broadcast a single network, and lets devices decide automatically if they wants to connect via 2.4GHz or 5GHz. If you would prefer to have separate 2.4GHz and 5GHz networks, you may disable this option

- If you wish to change your Wi-Fi SSID and Password, you can update the Network Name (SSID) and Password fields

- By default, Smart Connect is enabled - this feature lets your router broadcast a single network, and lets devices decide automatically if they wants to connect via 2.4GHz or 5GHz. If you would prefer to have separate 2.4GHz and 5GHz networks, you may disable this option
- Apply Settings
- Click Save and your settings will be saved, and your router will reboot
- If you have changed the Network Name (SSID) and/or Password of your Wi-Fi, you will need to reconnect to your new Wi-Fi network once the reboot is complete.