How to set up your Tenda TX9 Pro Wireless Router for use with your Pineapple Net connection
- Connect your Router
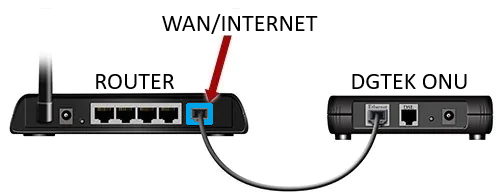
- For Pineapple Net FTTP Connections
- Connect one end of the Ethernet Cable to the WAN or Internet Port of your Wireless Router
- Connect the other end of the Ethernet Cable to the Ethernet Port of your DGtek ONU
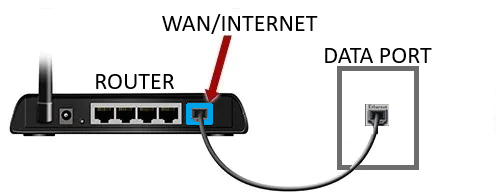
- For Pineapple Net FTTB Connections
- Connect one end of the Ethernet Cable to the WAN or Internet Port of your Wireless Router
- Connect the other end of the Ethernet Cable to the data port in your apartment
- The active data port will usually have a DGtek sticker on it to indicate the correct port
- The active data port will usually have a DGtek sticker on it to indicate the correct port
- For Pineapple Net FTTP Connections
- Reset your Router
- Press and hold the Reset button on the back of the router for at least 10 seconds, then release it.

- Press and hold the Reset button on the back of the router for at least 10 seconds, then release it.
- Connect to the Wi-Fi Network
- On a laptop, desktop, mobile or tablet, please reconnect to the Wi-Fi network. The name of the Wi-Fi network is located on a sticker on the base or back of the router.
- Your Wi-Fi Networks will be labelled “SSID” and the default password should also be listed on the same sticker

- Your Wi-Fi Networks will be labelled “SSID” and the default password should also be listed on the same sticker
- On a laptop, desktop, mobile or tablet, please reconnect to the Wi-Fi network. The name of the Wi-Fi network is located on a sticker on the base or back of the router.
- Access Router management page
- Once you have connected to your Router's Wi-Fi, open a web browser and type the following into the address bar and press enter:
- 192.168.0.1
- or
- tendawifi.com
- 192.168.0.1
- Once you have connected to your Router's Wi-Fi, open a web browser and type the following into the address bar and press enter:
- Run Setup Wizard
- Click Start

- Click Start
- Configure your Connection
- If the cable is correctly connected, it will attempt to detect your Connection Type
- Note: If the Setup Wizard is asking you to connect a cable and will not progress, please see the note at the bottom of this guide.
- If your connection type is PPPoE
- Select PPPoE from the Connection Type Dropdown then click Next

- Enter your Pineapple Net Username and Password then click Next

- Go to Step 7
- Select PPPoE from the Connection Type Dropdown then click Next
- If your connection type is DHCP or Dynamic IP
- Select Dynamic IP Address from the Connection Type dropdown then click Next

- Select Dynamic IP Address from the Connection Type dropdown then click Next
- If the cable is correctly connected, it will attempt to detect your Connection Type
- Setup your Wi-Fi Network
- If you wish to change your Wi-Fi SSID and Password from the default, you can update the Network Name (SSID) and Password fields

- If you wish to change your Wi-Fi SSID and Password from the default, you can update the Network Name (SSID) and Password fields
- Setup your Login Password
- You will need to configure a Login Password for your router which can be used in the future to login to your router to change settings
- You can manually configure a password by entering one into the Login Password field

- Or you can select the Set the WiFi password as the login password of the admin account to make it the same as your Wi-Fi password

- You can manually configure a password by entering one into the Login Password field
- You will need to configure a Login Password for your router which can be used in the future to login to your router to change settings
- Apply Settings
-
- Click Next and your settings will be saved, and the router will reboot
- If you have changed your Wi-Fi Network Name (SSID) and/or Password from the default, you will need to reconnect to your Wi-Fi Network when the reboot is complete.
NOTE During Step 6: If the cable is not connected, or there is an issue with the port/cable, the following message will appear.

This message could indicate the following scenarios:
-
- The Cable is not connected to the WAN port on the router
- The cable is not connected to the Ethernet Wall Port, or is connected to the wrong Port if multiple are available
- There is a fault with the Cable
- There is a fault with the Port
- To proceed, click Skip to configure the Router Admin Password. You will then need to restart the Router and log in to the Router User Interface again.