- Connect your Router
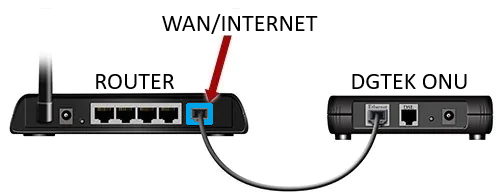
- For Pineapple Net FTTP Connections
- Connect one end of the Ethernet Cable to the WAN or Internet Port of your Wireless Router
- Connect the other end of the Ethernet Cable to the Ethernet Port of your DGtek ONU
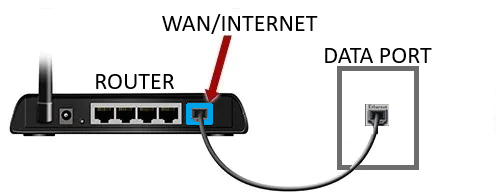
- For Pineapple Net FTTB Connections
- Connect one end of the Ethernet Cable to the WAN or Internet Port of your Wireless Router
- Connect the other end of the Ethernet Cable to the data port in your apartment
- The active data port will usually have a DGtek sticker on it to indicate the correct port
- The active data port will usually have a DGtek sticker on it to indicate the correct port
- For Pineapple Net FTTP Connections
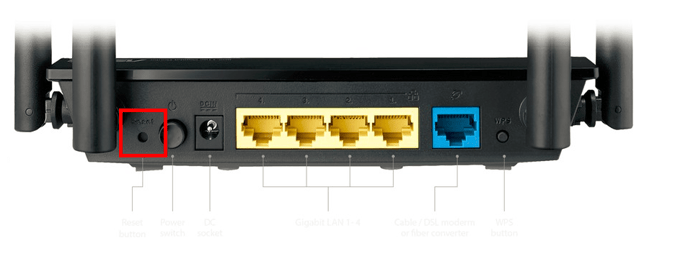
- Reset your Router
- Using a small object such as a paperclip or toothpick, press and hold the Reset button on the back of the router for at least 10 seconds, then release it.
- Using a small object such as a paperclip or toothpick, press and hold the Reset button on the back of the router for at least 10 seconds, then release it.
- Connect to the Wi-Fi Network
- On a laptop, desktop, mobile or tablet, please reconnect to the Wi-Fi network. The name of the Wi-Fi network is located on a sticker on the base or back of the router.
- These will be labelled “SSID” and “Password”
- These will be labelled “SSID” and “Password”
- On a laptop, desktop, mobile or tablet, please reconnect to the Wi-Fi network. The name of the Wi-Fi network is located on a sticker on the base or back of the router.
- Access Router management page
- Once you have connected to your Router's WiFi, open a web browser and type the following into the address bar and press enter:
- http://router.asus.com
- http://router.asus.com
- Once you have connected to your Router's WiFi, open a web browser and type the following into the address bar and press enter:
- Enter Setup Wizard
- Click the Manual Setting button

- Click the Manual Setting button
- Update Admin Username and Password
-
Set a new Router Login Name and Password. This Username and Password is used to access the Router Settings and can be set to anything you like
Once you have selected a Router Login Name and Password, click Next

-
- Set Router Mode
-
Select the Wireless router mode (Default) option, then click Next

-
- Configure your Connection
-
If your Connection Type is PPPoE
-
Select the option Yes, then click Next

-
Enter the Username and Password for your connection, then click Next

-
- If your Connection Type is DHCP
- Select the option No, then click Next

-
Select the option Automatic IP (DHCP) then click Next

- Select the option No, then click Next
-
- Setup your Wi-Fi Network
-
If you wish to keep the default Wi-Fi Network Name and Password, simply click the Apply button.
-
If you wish to change the Wi-Fi Network Name and Password to something different, click the option No, then enter your desired Network Name (SSID) and Password in the boxes below, then click Apply

-
- Apply Settings
-
Please make sure you take note of booth the Network Name and Password you have entered so you are able to reconnect to the network later, then click Complete

-
Your router will now reboot and connect to the Internet.
Note: If you have changed the default Wi-Fi Network Name and Password, you will need to reconnect to the Wi-Fi using these new details.
-
English